Graylog or the end of a horrible year (Part I)

2020 will be – for most people – one of the worst years in their living memory. The world is under lockdown because of SARS-Corona Virus 2 or Covid-19. As I’m part of a risk group, my social life is for almost 9 month limited to telephone and video calls.

And on top of it all – two of my favorite software projects dramatically changed directions in December 2020 and removing the main reasons why I’m using them. This blog post is about Graylog. The Centos Blogpost comes later in Part II.

Graylog

I’m using graylog for a very long time. Starting 2012 I began using it privately and urged my customers to use it as well. I know of at least 2 companies that started using it because of my endorsement and one of them switched to the enterprise version. I gave multiple talks about Structured Logfiles (for example @ Froscon 2013 – look at the Graylog 2 page ;-))
I finished the talk with the ‘catch’ that graylog was – at that time – one of the few Open Core Businesses that got a good split between the Open Source and Closed Source addon. In the last couple of years I did not give that much talks anymore, but still supported customers.

The big difference between other solutions like ELK, was that the Open Source Version of Graylog included a real integration into ADS. So you could decide based on LDAP Groups who could see which kind of messages. The Enterprise version has some very good features too, including Archiving and Auditing.

But with Graylog 4 they removed the possibility of using LDAP Groups, because they restructured LDAP Groups and now declared it an Enterprise feature called Teams.

This is – imho – a very bad business decision. I would like to explain why: one department of my customer has switched to Graylog about 2 years ago. It was free and more and more developers – after some growing pains – really embraced Graylog. After the implementation, it was used more and more and the enterprise version was bought because support was needed and the Archiving and Auditing etc. became more important. Another department in the same company looked also at graylog, but because now they have to buy the enterprise version immediately, they are looking more intensive at other options as well. Now there are also including ELK, Splunk and the integrated EFK Stack in OpenShift in their search. Because all of them are used at some department in the company as well. At the moment it looks that graylog will likely lose at the end and will not be the tool chosen.

To make matters worse – there was not a good communication of change: No warning in the release notes, hey this will go away in the open source version with release XY. No, the releas notes only read: ‘the … old Groups .. have been replaced by Teams in Graylog Enterprise‘. The only good information was in the bug tracker, with other users complaining. I would have hoped for something like that in an official release note: “For Open Source Users of graylog the LDAP and Active Directory group mapping have been removed.

If someone asked me for a Logging Solution in October 2020 my answer would have been Graylog – pure and simple. Now, I will lay out multiple solutions.

Posted in Fedora, logs | Tagged | Leave a comment

Hey, I just need a virtual Machine with …

If you just need a fast (manual) installation with a certain OS. Instead of downloading the ISO and than start the install. Just use virt-install that will do the download, startup etc. for you.

Yes, I know there are better way with images, but if you want an custom installation this is easiest.

virt-install --install centos8 --name  c8
virt-install --install debian10 --name d10
virt-install --install fedora33 --name fed33
virt-install --install centos7.0 --name c7

Yes, it is Centos7.0 for the current Centos7. Centos 7.8 and Centos7 does not work.
With Centos8 and centos-stream8 it uses a better name.

You get a complete list of supported OSs with osinfo-query os.

If you don’t want to use the default disk, memory or CPU you have to specify it.

Here my test for a Secure-boot TPM Install to test Clevis-TPM.

virt-install -n Secure-boot-test --install centos8 --memory=3072 --vcpu=2 --disk size=60,bus=scsi,sparse=true,discard=unmap --disk size=60,bus=scsi,sparse=true,discard=unmap -w network=default --controller scsi,model=virtio-scsi --boot uefi,loader=/usr/share/OVMF/OVMF_CODE.secboot.fd,loader.readonly=yes,loader.type=pflash,nvram.template=/usr/share/OVMF/OVMF_VARS.secboot.fd,loader_secure=yes --features smm.state=on --tpm model="tpm-tis",backend.type="emulator",backend.version="2.0"
Posted in Enterprise Linux, Fedora | Tagged | Leave a comment

Centos 7 to 8 Update

WARNING DANGEROUS!

Disclaimer: This is not supported and it can breaks you computer or delete your data. You have been warned. I take no responsibility if it breaks. Double check that your backup is working.

Past

My main server was updated from Centos 3 -> 4 -> 5 with the help of the undocumented upgrade option of Install CD. So I have a lot of experience with “unofficial” updating Centos. In between it was also moved from physical to a virtual machine. This did not work with update 6 -> 7. The project to port the official red hat tool to CEntOS did never took off.

At the end I had to reinstall my machine, but after more the 10 years of updates, it was time to cleanup, reinstall, configure and check everything. During the cleanup I found a couple of very surprising things that still hung around 🙂

Current

Now with the release Cenos 8. I don’t want to do that again (the 10 years are not up yet) and I tried to run an upgrade from Centos 7 -> 8. It kind of works, but of course it is not for the faint hearted. Yes, I did it in a test environment first.
An update from within a running Centos 7 did not work, because even with the available dnf, the old rpm from C7 was not able run the update.

EPEL and others

If you are using EPEL or other repos this procedure could remove some or all of the packages from this repos. Especially epel is still quite empty at the moment, also other projects do not support Centos8 yet.

Update

So you have to boot the Centos8 image and start a Centos8 rescue system.

You network configuration (network port name) could change as well, so be sure you can access the console (directly or via remote admin card)

You are asked if the file system should be mounted, please answer with yes.
The commands are quite simple:

rpm --root /mnt/sysimage/ -Uvh /mnt/install/repo/BaseOS/Packages/centos-release-*.x86_64.rpm
dnf --installroot=/mnt/sysimage/ distro-sync --allowerasing

It is possible that you have to remove some of the packages because it is missing the correct replace line in the spec. In my case I had to remove:

rpm --root /mnt/sysimage/ -e --nodeps systemvinit-tools python-inotify pycairo yum adwaita-qt5
dnf --installroot=/mnt/sysimage/ distro-sync --allowerasing
dnf --installroot=/mnt/sysimage/ install @base

If you use other groups like “Server with Gui” please install this group as well.

If you want to use a different language then English, please install the needed langpack like:

dnf --installroot=/mnt/sysimgae/ install glibc-langpack-de

If you prefer to use yum instead of dnf or if you had remove something that you need, you can do it now:

dnf --installroot=/mnt/sysimgae/  install yum

Cleanup

After that you can boot into your server again. It will take a longer time than usual, because a relabel will occur at the first boot. Be patient.

Cleanup the old repos:

rm -rf /var/cache/yum/ /var/cache/dnf/
dnf update --refresh

You can try to remove packages from EL7. But please be careful and check the removed packages. I had to install “@Base” and “@Server with Gui” again:

dnf repoquery --extras -q | xargs dnf remove

I urge you to run the following command and check the output:

dnf repoquery --duplicates 
dnf repoquery --unneeded 
dnf repoquery --extras 
dnf repoquery --unsatisfied

I clean out the rest of network-scripts as well and switch completely to NetworkManager:

dnf install NetworkManager-config-server
dnf remove network-scripts

I ran into a new intial-setup screen during every boot. To disable it I had to run:

systemctl disable intial-setup-reconfiguration.service

After that you have updated to Centos8.

Conclusion

I showed that it is possible to update from Centos7 to 8, but I’m not sure if I can trust this system after this upgrade. I will play around with test system at home and will write a new blog post, or update this post when I have decided for myself.

Posted in Enterprise Linux, Fedora, Linux | 2 Comments

Cool new tools

Just back from my vacation I learned two cool new tools on the first day. Of course both are in EPEL and Fedora.

  • The Silver Search: ag $STRING is an alternative to grep -ir $STING . But a lot of the hell faster, nicer output and multithreaded. https://geoff.greer.fm/ag/
  • myrepos: From the developer of etckeeper, to pull, commit and doing other stuff with multiple repos at the same time. Simply got to each git repo run mr register and than to a mr pull to pull all git repos at the same time. https://myrepos.branchable.com/


Posted in Enterprise Linux, Fedora, Linux, Uncategorized | Tagged | 1 Comment

Moving my Server with less than a second downtime

As I’ve written in my previous post, I moved to a new Hetzner Box. This is how I setup my virtual Host and how I moved my server, including all virtual machines, to the new data center with a downtime of a second or less. This setup is only possible if hetzner allows you to move you network via datacenter.

TL;DR

  • Use host routing to avoid wasting IPs
  • install centos-release-qemu-ev to install kvm/qemu from SigVirt/OVirt/RHEV
  • With the newer kvm/qemu you can use virsh migrate --live --copy-storage-all

Don’t waste IP addresses

Because fixed IP addresses are expensive wasting two of the eight IPs to have a broadcast network is not an option.

Virtual Machine setup

We create virtual Interfaces vif0 to vif7 and configure the routing to which we connect the virtual machines on eth0. We let libvirt call a little script on startup of the virtual machines. To do this we add the configurations to the libvirt/quemu xml config of the VMs with virsh edit virt0:

<interface type='ethernet'>
      <mac address='XX:XX:XX:XX:XX:XX'/>
      <script path='/etc/libvirt/scripts/vif-route'/>
      <target dev='vif0'/>
      <model type='virtio'/>
      <alias name='net0'/>
      <address type='pci' domain='0x0000' bus='0x00' slot='0x03' function='0x0'/>
    </interface>

which calls:

#!/bin/bash
#/etc/libvirt/scripts/vif-route

# $1 is interface

case "$1" in
      vif0)
      ip r a xx.xx.xx.x0 dev $1 &> /dev/null
      ;;
      vif1)
      ip r a xx.xx.xx.x1 dev $1 &> /dev/null
      ;;
      vif2)
      ip r a xx.xx.xx.x2 dev $1 &> /dev/null
      ;;
      vif3)
      ip r a xx.xx.xx.x3 dev $1 &> /dev/null
      ;;
      vif4)
      ip r a xx.xx.xx.x4 dev $1 &> /dev/null
      ;;
      vif5)
      ip r a xx.xx.xx.x5 dev $1 &> /dev/null
      ;;
      vif6)
      ip r a xx.xx.xx.x6 dev $1 &> /dev/null
      ;;
      vif7)
      ip r a xx.xx.xx.x7 dev $1 &> /dev/null
      ;;
esac
echo 1 > /proc/sys/net/ipv4/conf/$1/proxy_arp

exit 0

Setup inside the virtual Machine

Now we configure the network and routing for the virtual machines in /etc/sysconfig/network-scripts/ It should be noted, that the IP address is arbitrary. We need it becouse we cannot add a default route directly to a device, in this case eth0.

/etc/sysconfig/network-scripts/ifcfg-eth0

DEVICE="eth0"
BOOTPROTO="static"
HWADDR=XX:XX:XX:XX:XX:XX
IPV6INIT="no"
IPV6_AUTOCONF="no"
NM_CONTROLLED="no"
ONBOOT="yes"
IPADDR=XX.XX.XX.YY
NETMASK=255.255.255.255
TYPE=Ethernet

/etc/sysconfig/network-scripts/route-eth0

XX.XX.XX.YY/ZZ dev eth0
default via XX.XX.XX.YY dev eth0

Moving

Now we want to move the VM to our new server.

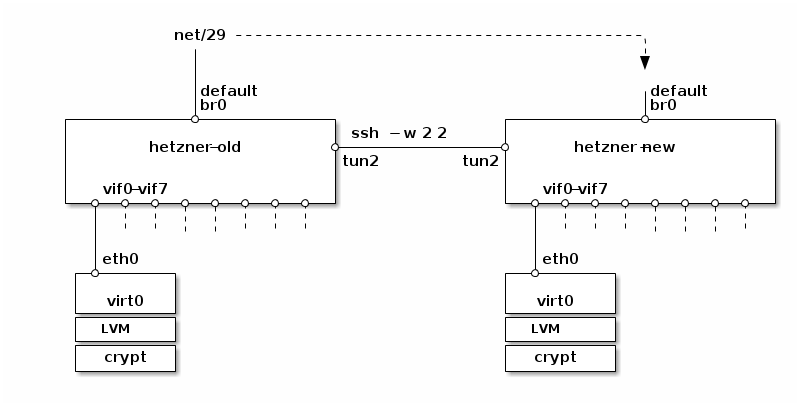
The old server, let’s call it Hetzner-Old, is a CentOS 7 with a bridged net/29 network and several virtual machines running on it (e.g. this Blog). The VMs are running on LVMs which themself are running on crypto devices. Each VM has its own LVM group.

The new server, Hetzner-New is also a CentOS 7 machine. The LVM devices have the same name and are of the same size or bigger. They have to have the same names. This is also a good opportunity to make an LVM device bigger without the need to shut down the according VM.

Now we add the repo for SIG Virtualisation on both machines.

yum install centos-release-qemu-ev

and update qemu/kvm etc

Next we open a tunnel between the two machines with

ssh -w 2:2 tun2-IP

and add ipaddesess on both sides (I will use ifconfig because othwise you have to use two commands)

ifconfig tun2 192.168.0.X/24

This way we have encrytion and don’t have to worry encryting it with TLS on qemu.

Server Diagramm

On Hetzner old we have to route through the tunnel tun2

ip r a net/29 via tun2-IP

Next we do

echo 0 | tee /proc/sys/net/ip4/conf/*/rp_filter

That way, when one of the network interfaces of a VM (vif+) gets removed, when the VM is moved, the according route is removed. Otherwise it would try to go through the default GW of Hetzner-New, wich is not allowed by Hetzner yet. Now, when the VM starts on Hetzner-New it has no interface to this IP-Address and it’s routed through the tunnel, through the GW of Hetzner-Old.

On Hetzner-New we add a new routing table with:

echo 201 vm-out >> /etc/iproute2/rt_tables

The number 201 is only internally used, therefore arbitrary.

Next we set a rule for every package where fwmark 1 is set use table vm-out:

ip rul a fwmark 1 table vm-out

Now we set a new default GATEWAY

ip r a default via IP-Hetzner-Old table vm-out

and set a firewall rule (vif+ are the interfaces for the VMs and iptables uses + instead of the commonly used *

iptables -t mangle -s net/29 -A PREROUTING -j MARK --set-mark 1 -i vif+

Now we are ready for moving the VMs from Hetzner-Old to Hetzner-New

virsh migrate --live VIRTUALMACHINE qemu+ssh://IP-HETZNER-Old/system --copy-storage-all --verbose --persistent

Finally we wait for Hetzner to swich the net/29 network over to Hetzner-New and throw away the previously set iptables rule. Since the new machine is in a different data center, Hetzner has to allow this moving. Because for this to work the net/29 network has to be in Hetzners core routers. With this command we wait for the first tcp package to arrive at Hetzner-New and flush our iptables rule.

tcpdump -i br0 net net/29 -s 1 && iptables -F PREROUTING -t mangle

Posted in Fedora | Tagged | Comments Off on Moving my Server with less than a second downtime

lmsensors for Monitoring a Hetzner EX41 with nct6775 on Centos7

Hi,

I recently rented a new Hetzner Box to replace my old. I moved from EX40 to EX41 and saving even some money every month :-).

Every thing went smooth, but the sensors did not work. I had to use nct6775, but the module from Centos7 said “No Device”. ElRepo to the rescue. They have a nct6775 kmod available, but this module is not compatible with Centos7.4 :-(.

First I had to created a fixed package. I changed only the release-number and the kversion to  693.2.2 instead of 327. The fixed version is available at: https://www.kuehnel.org/nct6775/. I also open a ticket with elrepo: https://elrepo.org/bugs/view.php?id=792. I don’t know how they will fix this. ElRepo uses kABI-tracking kmods and things like that should not happen. We will see.

With this fixed package installed I created the following configuration file (/etc/sensors.d/hetzner) with the help of sensors -u:

chip "nct6792-*"
 label in0 "2V"
 label in2 "3.3V1"
 label in3 "3.3V2"
 label in6 "1V1"
 label in7 "3.3V3"
 label in8 "3.3V4"
 label in9 "1V2"
 label in12 "1.1V"
 label fan1 "fan"

 set in0_min 2 * 0.80
 set in0_max 2 * 1.2
 # Can not set alarms
 #set in0_alarm: 0.000

 # SYSTIN
 set temp1_max 40
 set temp1_max_hyst 38
 # CPUTIN 
 set temp2_max 40
 set temp2_max_hyst 38
 # AUXTIN0
 #set temp3_input 40
 # PECI Agent 0
 #set temp7_max 40

 ignore in1
 ignore in4
 ignore in5
 ignore in10
 ignore in11
 ignore in13
 ignore in14
 ignore fan2
 # AUXTIN1:
 ignore temp4
 # AUXTIN2:
 ignore temp5
 # AUXTIN3:
 ignore temp6
 # SMBUSMASTER 4:
 ignore temp8
 # PCH_CHIP_CPU_MAX_TEMP:
 ignore temp9
 #PCH_CHIP_TEMP:
 ignore temp10

 ignore intrusion0
 ignore intrusion1
 ignore beep_enable

I can not fix the alarm for 2V (in0), but the rest looks good. Don’t forget to set the setting with sensors -s.

Update 15.10.2017: The module kmod-nct6775 is now update in elrepo directly, so only the configuration file is needed.

Posted in Enterprise Linux, Fedora, Linux | Tagged | Comments Off on lmsensors for Monitoring a Hetzner EX41 with nct6775 on Centos7

FreeNAS and check_mk

Hi,

I’m setting up two FreeNAS Server for Backup and Archiving and I really like FreeNAS 11. Thank good I didn’t have time to update it to FreeNAS Coral. 🙂

But I’m using check_mk for monitoring and I would like to use it to monitor FreeNAS as well. There is a check_mk agent for FreeBSD so the only problem is to run it.

I created this script to run it as a Init/Shutdown Script (both pre-init and post-init) . It will create everything you need, only define the BASEDIR at the beginning and put the check_mk_agent for FreeBSD in this directory. Make sure this script (check_mk_setup) and check_mk_agent are executable.

You also need to make sure inetd is running. I enable tftpd for that. Maybe some other service are possible as well. But I only tested it with tftpd.

#!/usr/local/bin/bash
BASEDIR=/mnt/myzfs/
if grep checkmk /conf/base/etc/inetd.conf &> /dev/null
then
  :
else
  echo checkmk stream tcp nowait root $BASEDIR/check_mk_agent check_mk_agent >> /conf/base/etc/inetd.conf
fi

if grep checkmk /conf/base/etc/services &> /dev/null
then
  :
else
  echo "checkmk 6556/tcp #check_mk" >> /conf/base/etc/services
fi

if grep checkmk /etc/services &> /dev/null
then
  :
else
  echo "checkmk 6556/tcp #check_mk" >> /etc/services
fi

killall -1 inetd

After the next reboot the system can be monitored by check_mk. It even survived the upgrade from FreeNAS 10 to 11.

Posted in Linux, Uncategorized | Tagged | Comments Off on FreeNAS and check_mk

qemu/kvm libvirt and trim with Fedora 25

Hi,

after more then 10 years of using VMWare Workstation (Starting with VMWare Workstation 5). I’m in the process of moving to KVM/libvirt, but I want to use qcow2 with trim support.

I’m using Fedora 25 with virt-manager to create my virtual machines. A lot of pages describe that very well like Chris Irwins. But I found another problem.

To support trim you need to make sure you have at least 2.1, but I want the latest version 2.7. This it the default, so normally you don’t need to change this with virsh edit DOMAIN:

<type arch='x86_64' machine='pc-i440fx-2.7'>hvm</type>

One parameter that you need to change manually (and that can not be done with virt-manager) tells qemu that the discard/trim should be forwarded to the underlying image.It looks like this:

<driver name='qemu' type='qcow2' discard='unmap'/>

All of this can be found on the Internet. A problem that I faced with RHEL7 and others is that virt-manager creates the disc-controller as a antique LSI/NCR controller and that RHEL7 does not support this. To fix this you have to this model to the scsi controller:

<controller type='scsi' index='0' model='virtio-scsi'>

With this RHEL7, Windows 10 and FreeBSD 11 Machines can be configured to run with trimming there images them self.

To migrate you Windows 10 from “libvirt” auf “libvirt-scsi” is quite easy. Add a new libvirt-scsi Disc to an existing Installation. Install the driver for libvirt-scsi, reboot. Now you system supports this driver. After the this reboot, shutdown the machines again and change the disc type of all discs to libvirt-scsi like above and reboot again. Your system should start up with it’s libvirt-scsi enabled disc.

To run the trim command to cleanup unused space, run this in an Admin PowerShell:

Optimize-Volume -DriveLetter c -ReTrim -Verbose

Rinse and repeat for all disc letters.

As always no warranty that this does not break you system.

Posted in Fedora, Linux, Uncategorized | Tagged | Comments Off on qemu/kvm libvirt and trim with Fedora 25

Citrix Reciever and SELinux

Hi Internet,

sorry for the longtime being absent from this blog. But marriage and a child takes time and the blog was the first to go. But I will restart writing blog posts today with a project I started a couple of days ago.

Selinux and the Citrix Reciever

I have to use the Citrix Reciever to access the Citrix farm in our company. This is the only way to access the company network remotely. But I don’t like to run it as unconfined_t on my Fedora 25. So I sat down and created a selinux modules to limit the access of this close source software on my system. In the process I found that it tries to read the mozilla profile and other stuff that I didn’t like and I therefore disabled this. The code is available on GitHub. Simply install the citrix reciever with the rpm from the Citrix website.

This is only a fast and dirty solution. If you want to clean in up, I look forward to it. If I have time I will clean in up, but maybe someone is faster then me (aka. has more sparetime) 😉

I will not give ANY waranty. If it breaks for you it is your problem.

After the installation of Citirx you can run it like this.

sudo dnf install make selinux-policy-devel
git clone https://github.com/JensKuehnel/selinux-citrixreciever.git
cd selinux-citrixrecievermakesudo 
make load
sudo restorecon -Rv /opt/Citrix/

It works for me, if you run into any problems tell me. I have a dontaudit rule against accessing mozilla_home_t. It still runs perfectly for me.

Next things on my selinux list is tlp-thinkpad. To put selinux rule in for tlp to run with akmod-acpi_call from the TLP Website.

Posted in Fedora, Linux | Tagged , | Comments Off on Citrix Reciever and SELinux

We need 64bit, everywhere!

Just bought a new 8TB disk drive. Following my standard procedures I run a badblock -w against the disk as burn in test. Running on Fedora 20 on x86_64 I was surprised to see this:

badblocks -v -v -w /dev/sdf
 badblocks: Value too large for defined data type invalid end block (7516192768): must be 32-bit value

Reproducer:

lvcreate -L 1G --type thin-pool --thinpool thin_pool $VG
lvcreate -T $VG/thin_pool -V 4T -n thinvol
badblocks -v -v -w /dev/$VG/thin_pool

Solution

badblock -v -v -w -b 4096 /dev/$VG/thin_pool
Posted in Enterprise Linux, Fedora, Linux | Tagged | Comments Off on We need 64bit, everywhere!